How to draw a wing
A friend asked me the other day how she should go about drawing angelic wings. To try to explain it through Skype was perhaps not the best idea - as her vague "uhs" and "okays" indicated. So here's a better idea: a tutorial, complete with illustrations.
For this tutorial we'll be using a bird's wings as reference. I don't know about you but I haven't run into any angelic beings lately that were willing to pose so that I could photograph them.
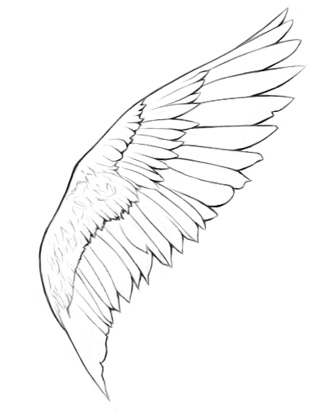
It's interesting that a bird's wing is similar to our arms. The shoulders and elbows don't quite sit where we would expect them to. Most of the wing is actually the bird's hand. You can think of the feathers as the fingers. See: wing anatomy.
Step 1. Study your reference picture. Note that all the feathers are not exactly the same. They don't have the same exact shapes. They are not precisely aligned. Some have indents. Some are folded over or under another. In this picture it is interesting to note that the primaries are arced upward, the secondaries are arced downward and while the tertials have almost no definition. The wonderful thing about nature is that everything is not perfect in the human sense of the word. Your drawing does not have to be perfect. All the feathers do not have to look precisely like the reference picture. So go nuts - improvise and be creative!
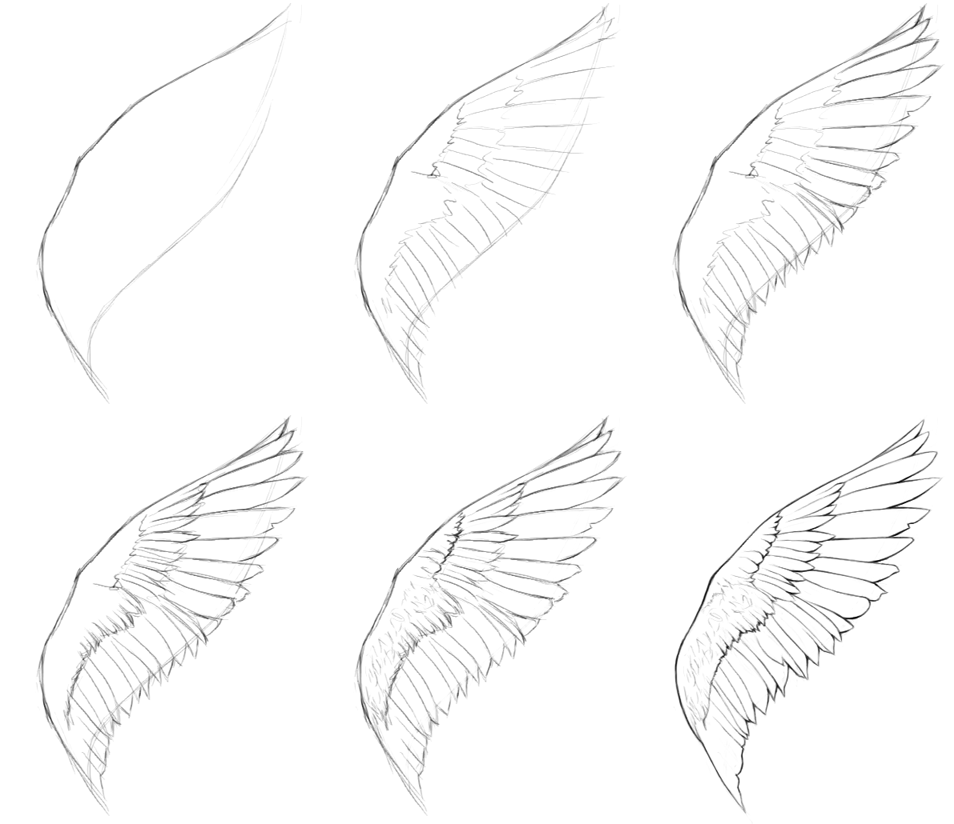
Step 2. Squint at your reference picture until you can almost not see it. Now focus on the outline and basic shape. Let's just focus on the right wing. Now draw the outline.
Step 3. Draw basic lines for the feathers. I see six compartments on this wing.
Step 4. Remove unnecessary guidelines. Outline each feather. Give it a shape. Note imperfections on your reference picture, like an indent on some and overlapping in others. There's an area that is not very clear - just add some random textures. Remember: Your drawing does not have to be perfect. Stay relaxed, keep your hand relaxed and make smooth curves.
Step 5. The hard part is over. This is where the fun starts. Let's clean up our rough work. Erase unsteady lines, double lines, messy lines. Redraw the feathers that look awkward.
Process animation thus far:
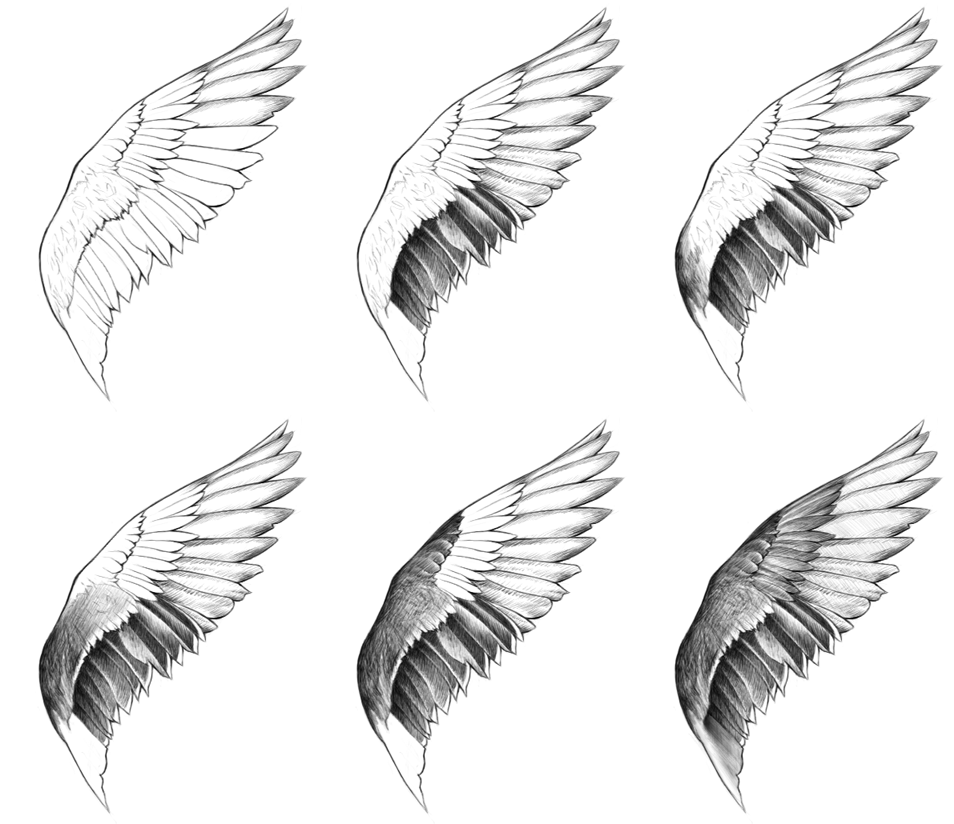
You could stop here, but one of the things that really makes a wing look good, except texture, is shading.
To shade, pretend that you are coloring in an area, but you are only using one color. If you use it correctly, with shading you can turn one color into ten colors or more. When shading, do not press harder to get darker colors, but rather "color" an area over and over until you get the desired level of darkness. Squint at your reference picture and pick up the dark, light and mid-tone areas.
Now we still only have one wing. Feel free to draw the other wing using the method described above. Personally I am way too lazy. I'll show you how to cheat.
Duplicating and Flipping in Adobe Photoshop:
Step 1. Scan your image and/or open your image in Photoshop.
Step 2.
Step 3.
Step 4.
Step 5.
Step 6.
Cheating has it's disadvantages. Anyone can tell that this has been copied and flipped. It is a good idea to make some changes to one of the wings. Take out indentations, change some of the feather's shapes, drastically change shading (it's best to do the copy/flip BEFORE you do shading).
Your wings are now ready to receive a body. Body tutorial coming next time, so don't fly away now!

Admin note: I found a cool online course called Pencil Drawing Made Easy that specializes in taking beginners and teaching them how to draw in a realistic style. The course itself is online video, so you can access it from anywhere in the world. I will do a full review of the course soon, but for now I just want you to know that I think it's definitely worth checking out, and you're sure to get better at drawing if you follow the lessons. I'm already learning a lot from it! The course teaches you how to draw ANYTHING realistically in pencil - from onions to hands to hyper realistic portraits. The teacher explains everything really well, so you'll understand exactly what you're doing and why. Click here to check it out!
About The Author:
BarakiEl's favourite things to do include creating digital art, listening to music, playing computer games and spending time with her husband. She works from home as a freelance desktop publisher, colourist and illustrator.
(Read more posts by BarakiEl)
Posted in: Art by BarakiEl on October 13, 2010 @ 4:29 pm
Tags: black angel wings, black fairy wings, butterfly fairy wings, gothic fairy wings, how to draw a bird


Only just saw this now... awesome guide 🙂 I especially like the animated step by step shading thingie.
I only draw with pencil on pure paper, don't need any fancy jim jams! (sounds like an old woman :P)
An excellent tutorial, my friend. Thanks for putting that together 🙂
~mk