
How to draw faces: female
Here's a quick tutorial on how to draw a face. (Also see our male face tutorial).
Please check out these tips before you read any further:
(If you've done one of my tutorials before you don't have to check the tips again).
I used Photoshop to draw this picture, but don't worry, it's the same on paper with a pencil and eraser. Doing it on paper is easier actually! Get your, pencil, paper, eraser and ruler ready.
First you'll need a reference picture. I found this one on Fotosearch.com.

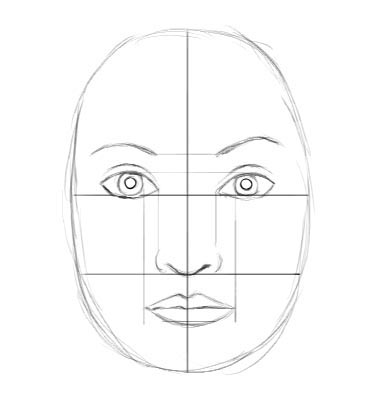
You'll note the face is oval shaped. We are going to use that as our base shape, a big oval. Please note that faces are not round! Unless the face is on a soccer ball...

Here's the oval. The top horizontal line basically cuts the oval in half and gives you an indication of where the eyes are going to go. The bottom horizontal line cuts the bottom half in half again and gives an indication of where the nose is going to go. (Use tricks like this when you study any picture. Proportion is your ally!)

Step 1. Now draw the oval on your paper. Cut your oval in half horizontally and vertically. Add the bottom horizontal line. (Feel free to use a ruler, but don't press too hard – we are going to erase these guide lines later. If we don't it will look as if she's going for plastic surgery... which is NOT what we are going for.)

Step 2. Add a guideline for the mouth, halfway between the nose and chin. This is for the lower lip.
Place the nose. Refer to your reference picture to get an idea of what the bottom part of the nose looks like. It has a half circle in the middle and two skewed half-circles at the sides. Don't worry about detail at this stage.

Step 3. Use the nose as a guideline for your eyes. The outer edges of your nose (the two skew half-circles) indicates where the inner corners of the eyes go. Draw guidelines for yourself.
Tips:
1. Eyes: When you draw your eyes keep in mind that the space between the eyes should be wide enough to fit in another eye.
2. Irises: When drawing your irises remember that the whole iris is rarely visible (unless the subject saw The Terminator show up at his front door). In this case the top part of the iris is behind the upper eyelid.
3. Eyebrows: Even though one eyebrow is lifted, both eyebrows have the same starting height on the inside (the points closest to the nose). To get an idea of how high the eyebrow should be add another imaginary eye above the left eye – that should give you more or less the correct height for the brow.

Step 4. Add the mouth. Use your previous guideline as an indicator for the bottom lip. The upper lip's line is about halfway between the lower lip and the nose. To work out how wide the mouth should be draw two lines from the inside of the irises vertically downwards. (In some people this guideline should go to the center of the iris/pupil).
Step 5. So... at this stage we have a freaky-looking puppet on our hands. Chucky is coming to get you! But in all seriousness, the hard part is over, believe it or not. Now we just prettify the picture, add details – all the fun stuff.
Erase your guide lines and give your face a shape. Pay attention to the cheekbones and the shape of the chin. This lady has a strong chin, but try not to make it too strong, otherwise you'll end up with a man.
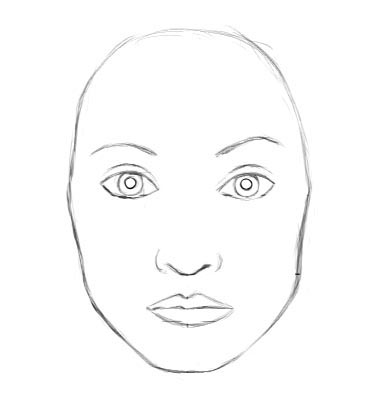
Step 6. Clean up the lines. Fix the mouth and nose shape, add the inner corners of the eyes.

Step 7. Finish up the eyes.
-
- 1. Clean up the lines.
2. Add lower lid.
3. Fill in the pupil and eyelashes
4. Add highlights and some detail on the iris.
Here's a quick process animation:

Step 8. Do the same with the other eye. Your face is basically done, but to give it depth it's a good idea to add some shading. I will do a tutorial on shading at some point, but if you know how to shade, please feel free to add some shading to your drawing.

You have reached the end of this tutorial. To improve your drawing skills act like shampoo and Rinse and Repeat! Practice, practice, practice and you'll be in league with the pros before you know it!
Here's a hair tutorial that goes with this. And here's an eye tutorial some may find helpful. Face from the side tutorial.
Possibly Related Articles
About The Author:
BarakiEl's favourite things to do include creating digital art, listening to music, playing computer games and spending time with her husband. She works from home as a freelance desktop publisher, colourist and illustrator.
(Read more posts by BarakiEl)
Posted in: Art by BarakiEl on May 17, 2010 @ 11:57 am
Tags: drawing a face, drawing faces, how to draw a face, how to draw a person, how to draw faces
came across your tutoriol this afternoon the most easiest to follow i have found, my dimensions have improved greatly, have also found i can transfer them to drawing cats, THANK YOU.
Glad to be of service. 🙂
[...] My recommendation would be to consider looking into proportion if you're going for realism. This is similar to how I learned them in high school. I mean clearly there's some fine tuning to be done [...]
This is what helps me when I draw people http://howtofixstuff.blogspot.com/2012/02/how-to-draw-people.html good fundamentals are very important
Useful. Ty.
luv it hels me a ton
best website then all I like it very much bye
YW! 🙂
This didnt help at all!! 🙁
So trace photographs?
Tracing definition : "a. To copy by following lines seen through a sheet of transparent paper." The method I'm attempting to teach is "referencing". Most (good) artists use this technique to some degree, whether it is studying a lizard so they are able to draw scales on their dragons or taking pictures of dilapidated towns to use as reference for the background of their apocalyptic masterpieces. Even Michaelangelo and Leonardo performed autopsies so that they could better study human anatomy and store the information for later use. Thank goodness we have photographs today!
not goog srry dd not help me
You won't get it right the first time. It's about practice.
I just looked at the finished picture and got an exact replica!:)
Excellent! Great job! Easy to follow instructions....Easy nose to draw.....I'm gonna follow your drawing classes!!!Thank you!
I REALLY ENJOYED YOUR EFFORD.
What if you cant draw an oval? Lol, jk! Thanks for the awesome guide!
lol
Rokatan eh knox sukama kamehema
This helped me SO MUCH! For my year 7 art exam i have to draw a face and this tutorial MADE ME PASS! Tnx!
Congrats!
I love it it helped me at school for the competition an i won brilliant thanks. =)
That's what I ask!
Excellent. Congrats.
do you have to draw the lines in the persons face before you draw ??????g
Which lines are you referring to? The guidelines? Yes, it is recommended. Keep them light so they are easy to erase later on.
loved it!!!this'll help me alot.thanks
its nice but dont you think the shadings are a bit raw?
Thank you for showing this but i really would like to learn how to shade can u do a tutorial as soon as possible
Will do.
Thank you, thank you, thank you!
This is the best drawing tutorial I've found.
REALLY helpful. Thank you!
I think that this website is great for drawing faces 🙂
This is great! Another helpful site I found is http://www.drawrealisticface.com .. The articles in the blog are really quite useful as well.. 🙂
Thanks.
Good tutorial very helpful
good one i like that
This tutorial is amazing! Thank you very much it's very helpful for people like me who've got like literally zero art skills! haha 🙂 Take care!-xoxo
I liked this tutorial, very easy to follow. I think a little over simplified, but very appropriate for beginners.
Yes, it is simplified. Not the method I use, but I wanted to make it easy for others to understand and duplicate. Ty for comment.
Ahh ThankYou! This is exactly what I've been looking for! It makes it so simple!
I'm glad you found it useful. 🙂
thank you it was so helpful
This is pathetic. I think it sucks. I am so lost about what to do, do step by step on each item.
I'm sorry to hear that.
I wish I was good as you!!!!!!!!!!!!!!!!!!!!!!!!!!!!!!!!!!!!!!!!!!!!!!!
hard. but thanks 4 the help
Please make a shading tutorial!!! I'd really appreciate one...really need one! Thank you!!
Will do!
This so amzing its so super betautiful face I want to draw this face
Great tutorial. One area I struggle with is the placement of the eyes - and this tutorial simplified the forward facing elements for me. Thanks for your help and for posting this...
You are most welcome. I'm glad you found it useful.
I <3 this web page I might use it more often
I'm glad you found it useful.
This was really helpful!!!!! But could you please do a tutorial with a girl tht is smiling? 🙂
Yes, I'll make an expressions tutorial, because you asked so nicely 😀
Very good job, thank you 😀
Ty.
really good drawing:) I wish I could do that bye sorry its a short reply.:) post more if you can 🙂
awesome i love it
Great tutorial! I don't draw that often and didn't think I could do a good job. However, I tried drawing this face and am very pleased with the results!! I've never really been that great with eyes, so I am really happy that you emphasized that part in this tutorial. I was able to get them to sparkle!! Haha. This is great for newbies like me. Though, I did take the liberty to change a few aspects of her face, and my mom commented that she looks like Paris Hilton. That was not my intention. Lol.
Lol, I'm glad it turned out well 🙂
This was very helpful:D
hey great tutorial loved really helped me on my realistic drawings now i just need to work on my shading
Really i didnt know it will this easy to learn to draw a human face i ll surely try it out and share my experience 😀
Please do!
Can you please help me draw a picture? Give me a tutorial exactly like this on how to draw a picture?
Good day I am dup from south africa. I am stil a learner I like to draw portrets.I like how you explain how to do drawings I hope you wil help me let me know thank you dup
this the first time i draw a girl and doesn't look like a boy .. hehe really i know how to draw really cute boys but i dunno why I cant draw a girl ./.. weird 😛
I'm that way too! The more I practice one, the more I forget how to do the other. It's all balance and practice, I guess. Ty for comment.
I wish I could draw that
You can!
what's happening with her eyebrow
Thank you so much!
I'm taking up drawing as a hobby, and this
helps me a great deal.
Cheers!
??? I don't get alot of things, but i realy don't get this... ∆
Hey so this helps, and i kinda learned this last year. So yeah thanks:)
ok so thanks soo much for this!! Im using this for school and wish i could find out ur real name, bc thats what needed.!! 😛 but i got some useful information out of it!! Thank u:)
hi i made a face and it looks greattttttttt
thes are great female
::-)n not draw at all I'm serouise
🙂 🙂
I am having a hard time with the shading. Can you help!!!!???? PLEASE!!!!
this was very helpful and i am going to show it to my art teacher good grades here i come!!!!!
Awesome post! I love Photoshop. Here is a related article that I wrote about turning a face into a cartoon: http://socialmediabar.com/cartoon-yourself
Thanks for the great art info!
this is just a must have for all beginners.
Those who are saying 'it does not help me';
means that they are not following one of the main essential trick: PRACTICING, again & again.
If this tutorial does not help you,
nothing will help you.
[…] Traditional Proportions Here, we find the same suggestion of drawing over an existing photograph, but in the context of simply […]