
How to draw hair: female
Some commenters expressed an interest in a hair tutorial. Today is the day they shall have their way!
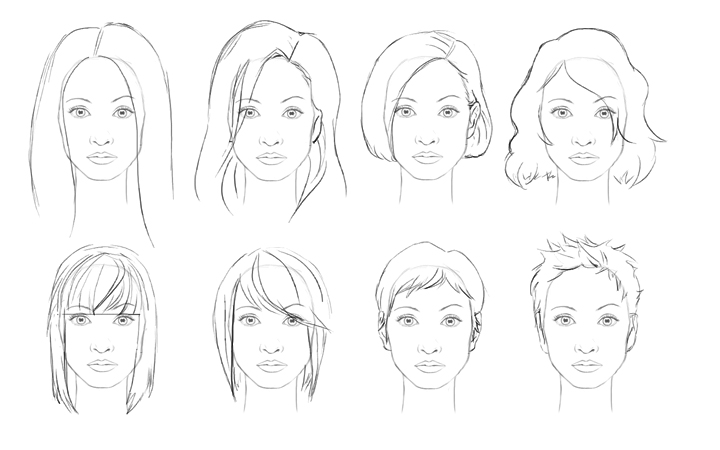
I found a few interesting hairstyles here. I strongly recommend you go check it out. The website says these hairstyles go well with an oval face. As I am fashionably challenged I have no idea and I'll take their word for it. Here I drew a few examples I found on that site (as a base I used this face) :
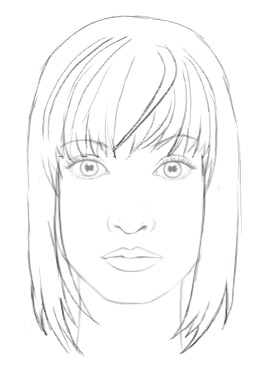
Step 1. Find a hairstyle you like, one that suits the face you are drawing. I chose this one because the bangs make things interesting:

Step 2. Draw a rough outline, with some guides. Keep your hand relaxed as you draw the smooth curves and lines. Remember there is no right or wrong with hair. Just go with what looks good and what makes sense physically. If you brush your hair now and make everything perfect, when you check in the mirror in five minutes it will have changed again. The hair you are drawing doesn't have to be perfect, in fact it shouldn't be perfect.

Step 3. After you've drawn the rough outlines, look for areas that look weird. Does the hair compliment the face? Is the head shaped funny? Does it look too big? Stand back from your work to get an overall feel for it. In my example the face looks fat in the bottom, so I corrected it with some more hair on the left.
Step 4. A frequent mistake I see beginners make is that they try to draw individual strands of hair from the outset. The funny thing about hair is that it behaves in groups (think of curls and locks). Look at anime and manga drawings - remember Dragonball Z hair? Those triangular shapes is the artist's impression of the groups hair make. Keep this in mind and start adding clusters of hair to your image. (Not individual strands, but groups/clumps of hair.)

Step 5. Now that your basic guides for the clusters of hair is down, the fun part begins! Draw more lines and in so doing add shading. The person has millions of hair on their head so just follow the basic guides you already put down and put in more lines along those guides. All hair in a cluster should be going in the same direction. Here's an animation to demonstrate:

Note:

Follow the grain. Hair rarely if ever crisscrosses one another, so don't use that style of shading here. All your strands in one group/cluster should go in one direction.
Step 6. Darken some areas by adding more lines and pressing a little harder. Try not to press too hard, because it really is a pain in the arse to erase, especially if you are using pencil and paper.

Her bangs still looked a bit flat compared to the rest, so I added some more shading.

Step 7. Add in some random loose single strands that don't have anything to do with anything else. Remember: imperfection is perfection when it comes to hair. Some imperfect loose strands of hair here and there will add a sense of realism to the piece.

And you're done. If you have any questions, feel free to comment and ask. I will definitely get back to you.
Face tutorial that goes with this. Here's an eye tutorial for those that might be interested.
"Great art is not necessarily perfect art." ~ - unknown
be perfect.
Possibly Related Articles
About The Author:
BarakiEl's favourite things to do include creating digital art, listening to music, playing computer games and spending time with her husband. She works from home as a freelance desktop publisher, colourist and illustrator.
(Read more posts by BarakiEl)
Posted in: Art by BarakiEl on July 29, 2011 @ 6:02 pm
Tags: bob hair style, girl hair, hair shading, hair tutorial, how to draw hair
hey, ..gr8 job man...can u gimme few more tips about how to create manga hair..visualization or differ types of shades...manga characters
I'll do a tutorial on manga hair at some point. Watch this space 😉
Great job man, Wish i could draw like you. Every time i go to do something like this it turns out crap! 🙂
wow!! my hair looks sooo much better now!! thanks! we have to draw a self portrait and this helped lots!!
Yay! Glad it helped 🙂
You are wonderfully kind to give your excellent tutorials
free of charge. Paid art classes haven't been nearly as
good as your expert assistance. Thanks so much!
lol I'm definitely not expert! But I do try to share what I have learned. I'm glad it could be of help to someone!
unfortunatly didn't find this tutorial very helpful as you don't get the tutorial in the different hairstyles! what is the point in that!?
I'm sorry you feel that way. Due to time constraints I meant to show the method. The basic method is the same for most hairstyles. The idea is to adapt it to the hairstyle you would like to do.
eye one my looks exactly like maybe better
Hey great tutorial. I appreciate how you really break it down. I love figure drawing but faces (and hair) have always been my weakness. The only thing I don't like too much is the use of animation – means I can’t print a copy for reference.
I have been using your tutorial in my classroom for my students that missed a few things during my project introduction. The one thing I still need to find is a tutorial I can print about drawing short mens hair. I have showed them a few times but several of the students have taken better to reading it off a packet. Having them pick up the packet goes faster than me go student to student and teach it to everyone in my 6 classes of 30. Do you have a tutorial for short mens hair that I am overlooking?
Sir ur suggestions r really workin out!!!Thanks alot!
M a engineer, i do sketching coz its my passion. anyway i got a good teacher.
sir, since my childhood drawing is my hobby but frankly I am zero on this. My be I need good teacher. Now let see may be your guidens help me.
hey! i have done your female face tutorial, and i was wondering if you could post a tutorial on the expressions on a face. thankyou in advance!!!
Thank you, will do. Someone else also showed interest in expressions.
your drawings are amazing! because of you, im a great artist!
I am interested in the page boy cut, could you give some direction, please.
I like your hair drawings I will use it if the face is righ thanks you are good
Glad to be of help!
you are so good and this was so helpful thank you ever so much
I tried and I failed not completely it was okay but you are a great artist I wish I could draw like you